Modify Linux Process Execution Priorities (103.6 LPIC1)

process priorities title
5
(1)

This post will cover the Linux Professional Institute 1 (LPIC1) certification subject (103.6) on how to “Modify Process Execution Priorities”.

If you haven’t already read my other post on “How To Create, Monitor & Kill Processes” then I’d recommend covering that topic before this one if you’re not familiar with processes.

That previous post covers the ‘top’ and ‘ps’ commands and so these tools will also be relevant in this post too.

Once you’re confident in creating/monitoring and killing processes we can now move on to modifying their priorities right here!

Contents

1. What Is A Linux Process Priority?

In linux we will almost certainly have multiple jobs (or processes) running.

Some of these jobs are more important than others and so we need to give each of those processes a priority.

Some processes are important to keep the system functioning correctly, and others are not so important.

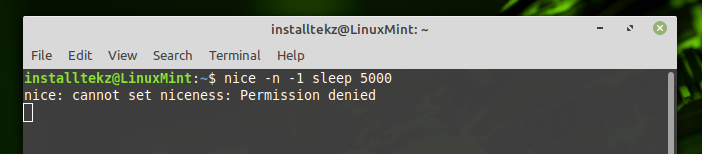
The important jobs are handled by the super user and so a regular user can’t change the priority of those jobs, but they CAN change priorities of their own jobs.. but only up to a certain point.

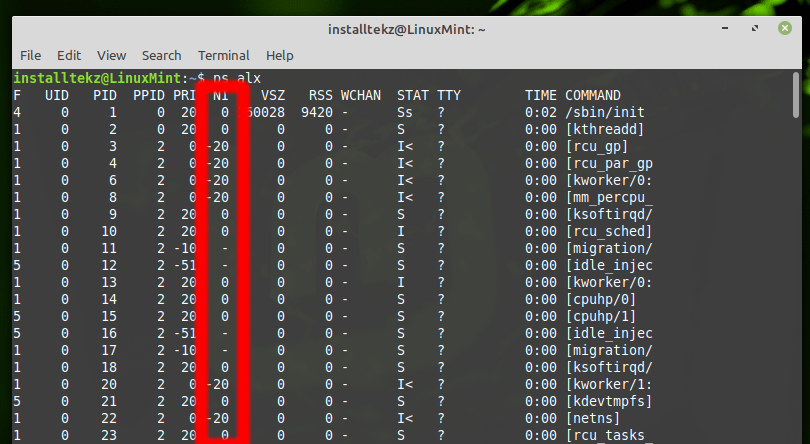
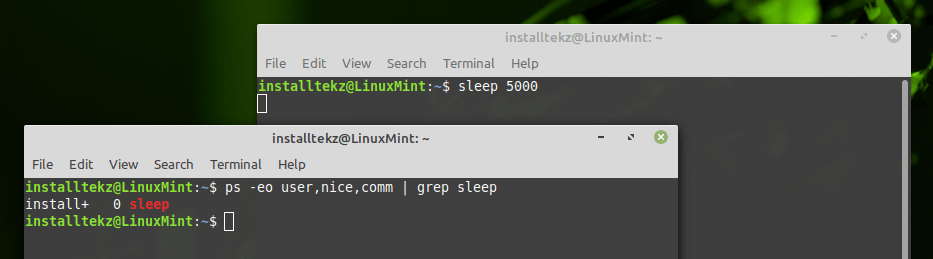
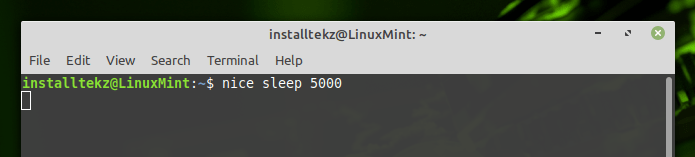
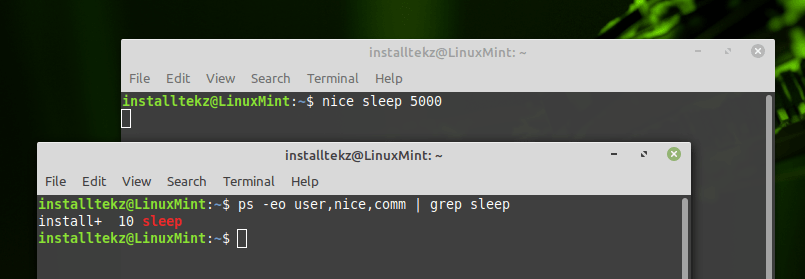
Linux has a system in place that organises these process priorities, and we call it ‘niceness’.


2. Why Modify Linux Process Priorities?

As a Linux Administrator we will almost certainly need to deal will jobs that are “hogging” our CPU and other resources from time-to-time.

Because if we don’t manually step in, our system will run slow for all users on the system.

3. How Do I Change The Priority Of A Process?

To change the priority of a linux process we can use the nice and renice commands from a terminal.

So, What Is ‘nice’?

Each process in our linux system needs to have some of the CPU’s time. Each process is assigned a ‘nice’ number.

The higher the number, the more ‘nice’ the process is.


Therefore, the process will give way to other, more important tasks first. Only when the CPU is idle (has nothing to do) will our processes continue to run (in order of niceness).

This is all handled by the kernel.

Levels Of Niceness

The levels of niceness start from -20 and count up, all the way to +19.

-20 being the MOST important jobs, and +19 being the most ‘nice’ (The LEAST important jobs).

The root user (super user) can assign any nice level from -20 to +19, but a regular user can only assign a process from 0 to +19 and the process needs to belong to the user who is changing the nice level.

The lower the number, the higher it’s priority.

4. How To IDENTIFY 'nice' Levels

The ‘ps’ Command

The ‘ps’ (Process Status) command can be used to view our current running processes along with their ‘nice’ levels.

There’s a serious amount of info that the ‘ps’ command produces and we won’t need to know everything in the output for this topic.

‘ps’ command has a HUGE range of options too and we can check them out in the manual if we run the following command:

man ps 

Some of the most common options used for ‘ps’ are:

  • ps aux (This command does NOT show ‘nice’ level)
  • ps alx (l=long view shows nice level as “NI”)
  • ps -eo (e=everything, o=output_format) then_specify_options
 
With the “ps -eo” command we can specify what columns of data we want to see, and in what order we want to see them. For example:
ps -eo user,pid,pcpu,nice,comm 

The above command will show only the five columns that we specified.

Don’t forget that we can always pipe the ‘ps’ output through ‘grep’ to narrow down the output that we receive such as “ps aux | grep program_name_here” for example.

linux process priority
'ps alx' command shows 'nice' levels

We can also use the command ‘pstree’ to view what processes are running.

However, it’s not particularly great at providing much info and especially when it’s compared to the ‘ps’ command.

The ‘pstree’ command  is in the LPIC-1 certification and so I will cover it further down this post.

The ‘top’ Command

If you’ve read my other post on how to “Create, Monitor & Kill Processes” then you’ll hopefully by now have some experience in using the ‘top’ command.

If we open ‘top’ we can again use the arrow keys to sort our output by ‘nice’ level.

The below screenshot shows the ‘nice’ output from the ‘top’ command:


linux process priority
nice levels are highlighted in red from the 'top' command output

‘top’ is a great tool to quickly check what ‘nice level’ our currently running commands are using.

If we notice that a command is using a significantly large amount of CPU then we can always change the ‘nice level’ so these processes only run when other processes don’t need the CPU time.

5. What Is The Default Priority Of A Created Job?

When we run a command from the terminal, our command is usually given the priority of “0” nice level as a default.

But when we run our command through ‘nice’ then our program will have a default nice level of “10”.

In the following examples I will use the ‘sleep’ command to demonstrate the default ‘nice’ levels.

Standard ‘nice’ Level

The above screenshot shows me starting a ‘sleep’ command in a terminal

(This ‘sleep’ command will sleep for 5000 seconds)

Next, I open up a new terminal and run the ‘ps’ command. This provides a lot of output due to the many processes running.

I only specify three columns to show their output. These are: user, nice level and the command.

Here I start the ‘ps’ command again, but this time I only want to see lines that include the text string “sleep” so I use pipe and grep. This will give us a cleaner output.

I notice here that “0” shows up in the ‘nice’ column. This is because “0” is the default ‘nice’ level.

Running A Command Through The ‘nice’ Command

The above screenshot shows me running the ‘sleep’ command once again. However, this time I am running it through the nice’ command.

Now when I run the ‘ps’ command, we can see that the ‘nice’ level for the ‘sleep’ command is now “10”!

6. How To START A Process With A Higher Or Lower Priority Than Default

So now we know that starting a command with the ‘nice’ command will give it a different, higher nice level by default.

But what if we don’t want to use the default value of “10” as our ‘nice’ level?

The above command shows me trying to set the ‘sleep’ command with a ‘nice’ level of “-1”. Because a negative number (-1 through to -20) can only be set by the root user, I receive a “Permission denied” error.

Here I tried running the same command again, however this time I set the ‘nice’ level to a positive 17.

My command now runs successfully as I don’t need super user permissions for ‘nice’ levels from “0” through to a positive 20.

After running the ‘ps’ command again, we can see our ‘sleep’ command is now set to a “17” nice level. 

Super User ‘nice’ Levels

If we want to run our ‘sleep’ command with a ‘nice’ level below zero then we will need to execute it using “sudo” and providing the super users password.

After running the ‘ps’ command I can now see that the ‘nice’ level for the ‘sleep’ command is set to “-1”.

Notice also that the “user” is now “root”!!

I no longer own this process!

7. How To CHANGE The Priority Of A Running Process

To change the priority of a running process we can use the “renice” command to change a ‘nice‘ level.

If we’re wanting to change a ‘nice’ level that is owned by root then we will need to use “sudo”.

Let’s try and change the nice level from the previous command. The previous command (sudo nice -n -1 sleep 5000) is now running at a nice level of -1 and is owned by root.

Firstly we need the process ID of the command if we’re going to change a nice level.

I will use the ‘ps’ command again here, but I will need to add the “pid” column this time so I can see the Process ID of the command:

‘ps’ command shows my ‘sleep’ command which is now owned by root and has a ‘nice’ level of -1. This command now shows the jobs Process ID too (1198).

Here I run the ‘renice’ command. I need to use “sudo” because the job is owned by root. I am renicing the job to 11 and I need to specify the Process ID using “-p 1198”.

The output shows us the old priority and the new priority.

Here I run the ‘ps’ command again. It shows the new ‘nice’ level of 11.

renice all of a users processes

If we want to ‘renice’ all jobs for a particular user then we can specify the user instead of any process ID.

If I run the following command:

sudo renice 19 -u installtekz 

then all of my processes will be assigned a new priority of 19!

This would significantly slow down all of my running jobs as “19” is the lowest priority that can be assigned.


8. The 'pstree' Command

If we execute the following command from a linux terminal:

pstree 

we will get output on the terminal which looks similar to the following screenshot:

linux process priority pstree
'pstree' command output

The ‘pstree’ command shows a visual representation of the hierarchy of all of the processes that are currently running, and in a tree-like format.

If a parent process is killed then all of the child processes that reside below it will also die too. 

I guess this tool will help you understand what processes are child processes of others but apart from that, the ‘pstree’ command isn’t much use elsewhere.


Conclusion

Hopefully by now you have a good understanding of how to modify linux process execution priorities and are familiar with the terms ‘nice’ and ‘niceness’.

This post is heavily focused on the “nice” levels that our linux system uses to prioritise jobs over others.

The certification topic also requires us to know the pstree command (although it isn’t much use to us as a Linux Admin) and the ‘ps’ and ‘top’ commands.

Resources:
A helpful resource can be found Here for a Question and Answer guide to help you pass the LPIC-1 certification!

FREE Download: Linux Mint Tool Collection!


Install tons of great software from the Linux Mint repository with my personal tool list that I’ve built up over the years. I also keep this list updated from time-to-time.

For more information Click Here
linux mint tools pdf
installtekz icon

Quote Of The Day

installtekz

"When wireless is perfectly applied, the whole earth will be converted into a huge brain..." - Nikola Tesla, 1926

How useful was this post?

Click on a star to rate it!

Average rating 5 / 5. Vote count: 1

No votes so far! Be the first to rate this post.