Create, Monitor And Kill Processes In Linux (103.5 LPIC1)

processes title
5
(1)

What use is it to be in control of a linux system, if we have no control over any processes, am I right?

This post will take you through the Linux Professional Institute 1 (LPIC1 103.5) certification topic of how to “create, monitor and kill processes in linux”.


By the end of this post you should not only have the knowledge and skills to show your competency in the exam, but you will know just how to manage processes in the real world, whether it’s in a job environment or at home in your pajamas.

As always, I encourage you to follow along with me when I show you commands here as this is where you will truly learn.. by doing!


Contents

1. Background & Foreground A Process/Job

How do you create a new process in linux..? We simply run a command which will generate a new process.

Some commands will terminate immediately and so the process dies along with it.

However some commands can run indefinitely thus leaving a visible running process.  

When we open up a linux terminal and execute a command, by default, the command runs in the terminal that we are currently working in. So if we cancel the terminal, we stop any command that may be currently running.

Not only that, but when we execute a command from the terminal we have no access to the terminal until the previous command has completed.


So what can we do if we need to run a command that would take many minutes, hours or even days to run? Do we sit around and wait for a command to complete before executing another?

We could do this but we can also background the process. When we do this we are given back control of the terminal almost instantly after executing a long process.


Take for example, the ‘sleep’ command. Sleep does just that! It sleeps. It waits for the amount of time, set by you. The following command will sleep the terminal for 1000 seconds:


sleep 1000 

If you’re following along with me then you will notice that while this command is running, we do not have a prompt. We have no control over the terminal until the ‘sleep’ command completes.

(To stop a command while it’s running in the foreground, we can use: Control + C)

create monitor and kill processes in linux sleep command
Screenshot shows the 'sleep' command. User has no control over the terminal
create monitor and kill processes in linux
Control+C stops the process. User now has control over the terminal

Background

To background a process we simply add an ampersand (&) to the end of our command, like such:


sleep 1000 & 
create monitor and kill processes in linux sleep command
Backgrounding a process

By doing this we get a prompt returned back to us almost immediately.. but the sleep command is still running. We just can’t see it.

The output we receive when we execute the above command will show a number in square brackets and another number beside it.


The number in the square brackets tells us the job number. The next number tells us the PID (Process ID).

If we want to see the jobs that are currently running, such as our ‘sleep’ command we can simply execute the command:

jobs 
create monitor and kill processes in linux jobs command
'jobs' command shows a running process

The output will give us the current running commands, along with their job number.

Let’s do it again and see another running process along side the first process. If we run the command:

sleep 999 & 
create monitor and kill processes in linux sleep command
backgrounding a new job

You will see that we get a different job number and a different PID. The job number is usually incremented by 1.

Now, if we run the ‘jobs’ command once again, we can see we now have TWO jobs running.

create monitor and kill processes in linux jobs command
'jobs' command shows 2 running processes

Interact With Processes

Because our two currently running jobs are in the background, we need to bring them to the foreground individually if we want to interact with them.

To do this, we use the ‘fg’ command.

To bring a backgrounded process to the foreground by using the ‘fg’ command, we specify the job number along with it. For example:

fg 1 
create monitor and kill processes in linux
'fg' (foreground) command with job number

By running this command, we see that the command is brought forward and we have direct control over the process.

What if we want to sent that job back to the background again?

To do this we need to SUSPEND the process first, by pressing: Ctrl + Z (hold ‘Control’ and press the ‘z’ key).

create monitor and kill processes in linux suspended job
Suspended current job

The terminal output will show us the the job has been ‘Stopped’.

We can see that the job still exists by executing the ‘jobs’ command again:

jobs 
create monitor and kill processes in linux jobs command
'jobs' command shows a stopped process & a running process

But it is stopped. To get the job running again we need to issue the background command on it. To do this we use ‘bg’ followed by the job number (the one in the square brackets).

The following command is an example of starting the job number 1 again:

bg 1 
create monitor and kill processes in linux
backgrounding a job by using it's job number will start it again

To check that it’s running again, we run:

jobs 

And we can see the job is now running.

jobs command
'jobs' shows our 2 running processes

What Happens When We Change Terminals?

If we minimise (but don’t close down) our current terminal, and open up a new terminal then we don’t have access to our two ‘sleep’ commands any more! (Try running the ‘jobs‘ command in the new terminal) So how do we gain control over these commands again?

Well if we issue the following command:


ps aux 

We will receive output on the screen which shows us running jobs.

The “aux” flags will help us to see what users are running the processes and also show us running processes that are outside of our current terminal. These “ps” command options can be seen in the manual, with the command:

man ps 
ps command
Screenshot shows 'ps aux' command output & the 'sleep' processes. Our two 'sleep' processes are not shown in image above

If we execute the command:

jobs 

from our new terminal, we won’t see our ‘sleep’ jobs that we created because we started a new terminal.

jobs command
'jobs' command shows no current jobs in new terminal

2. How Do I Kill A Specific Process In Linux?

After finding the command needed to be killed by using ‘ps’, we can then use the ‘kill’ command to kill a specific process in linux.

Because the ‘ps aux’ command shows so many processes, we can pipe the output of the command to the ‘grep’ command so we can filter out much of the output and show us our ‘sleep’ jobs more easily.


If you’re new to piping then check out this post ‘What Are Linux STREAMS, PIPES & REDIRECTS?‘.

By executing the following command we can see our ‘sleep’ jobs that we created:

ps aux | grep sleep 
ps command
'ps aux | grep sleep' command shows our 'sleep' jobs more clearly

Please note that the ‘grep –color=auto sleep‘ command is not part of my example and it’s safe to ignore it during this demo!

If we want to stop (or kill) one of these jobs, we simply use the ‘kill’ command followed by the PID which is shown in the output. Here is my example:

kill 9044 

If we run the ‘ps aux | grep sleep‘ command once again we can see (or NOT see in this case) the ‘sleep 1000‘ process has gone!

kill and ps command
'kill' command followed by 'ps' command

killall

If we had a bunch of ‘sleep’ commands that we wanted to stop then we could use the ‘killall’ command followed by the name of the command we wanted to stop. Example:

killall sleep 

Be very careful here though because this command may kill processes you didn’t intend to stop. Take EXTRA care when running this ‘killall ‘ command as the root user too as it is very possible to kill every users current running processes who are using the system. 


If you’re following along at home on your personal computer then this wont be much of a problem but on a network with lots of users then this could get messy.

Usually, a regular user can only kill their own processes.

3. How To Keep A Process Running AFTER We Log Out

In the last section I explained that when we close the terminal window and start a new one, we can still access our background processes.

But.. When we log out of the linux system, a hang-up signal is sent to all of our currently running processes, which in turn will KILL our jobs.


But what if we want these jobs to continue running when we log out? We use the ‘nohup’ command in front of the command we want to background.

Here is an example:


nohup sleep 1000 & 

Now we can logout out of the system but this ‘sleep’ command will continue to run in the background because the hang-up signal won’t be sent to this ‘sleep’ command.


One of THE most common times I usually use this ‘nohup’ command is when ever I connect to a remote server using SSH.

If you’re unfamiliar with SSH right now then don’t worry about just yet as this isn’t part of this topic but I just wanted to make you aware of it right now.


This ‘sleep’ command doesn’t have any output, but if we were running a command that DID create output, then this output text will be stored in a file called ‘nohup.out’, ready for you to look at when you log back in to the system again.

We can STILL use the ‘kill’ command to end this process like normal.

FREE Download: Linux Mint Tool Collection!


Install tons of great software from the Linux Mint repository with my personal tool list that I’ve built up over the years. I also keep this list updated from time-to-time.

For more information Click Here
linux mint tools pdf

4. How To Sort Processes For Viewing And Monitoring With The 'top' Command

If we execute the command:


top 

we get a whole bunch of information.

This is a great way to see what processes are running on the system, and by default, ‘top’ will sort the current processes by how much CPU each process is using in percentage but we can change this by using the left and right angle brackets (<>).


The list of processes gives us a snapshot of their usage and is continuously refreshed in real-time. You will notice that the order of these processes will change as the CPU resources change.

create monitor and kill processes in linux top command
Screenshot showing the output of the 'top' command

top’s options

If we press the ‘h’ key (for help) while ‘top’ is running, we will see a list of options available to us.

As you can see from the output we can perform many actions for ‘top’ such as color mapping and sorting.


We can return to the main screen again by pressing the ‘Esc’ or ‘q’ keys and further quit the ‘top’ command by pressing ‘q’.

top command options
Screenshot showing the 'top' command's options ('h' key)

Kill A Process From Within ‘top’

We can kill a process from within ‘top’ it’s self by pressing the ‘k’ command and then entering the PID (process ID) of the process we want to kill.

We would then be asked what signal we would like to send to kill the process and by default ’15’ will be chosen.

This is the standard sig-term (signal terminate) that “asks” the process to die but we can also specify another signal if we wanted to.


Sig-15 is considered the cleanest way to kill a process, but if a process doesn’t seem to be be stopped then we can use sig 9 (sig-kill). Signal 9 will kill the process right away, rather than “asking” it to die by using signal 15.


This is just a brief overview right now on linux signals and I will cover this topic in more detail in a later post, but for now we need to know how to end processes from within ‘top’.

5. The 'uptime' Command

create monitor and kill processes in linux
'uptime' command output

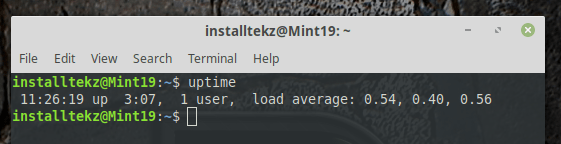
The output of the ‘uptime’ command will give us some useful information about how long our system has been running.

If you’re familiar with the Windows operating system then you will know how often you will need to restart your computer.


But systems that run linux can be mission-critical as most servers across the world are running linux and we can’t simply reboot or shutdown these systems on a whim.

Other than that, linux doesn’t often need to reboot and so using the ‘uptime’ command we can see just how long ago the system went down.


‘uptime’ will also give us other information such as how many users are currently logged on to the system and the load average.
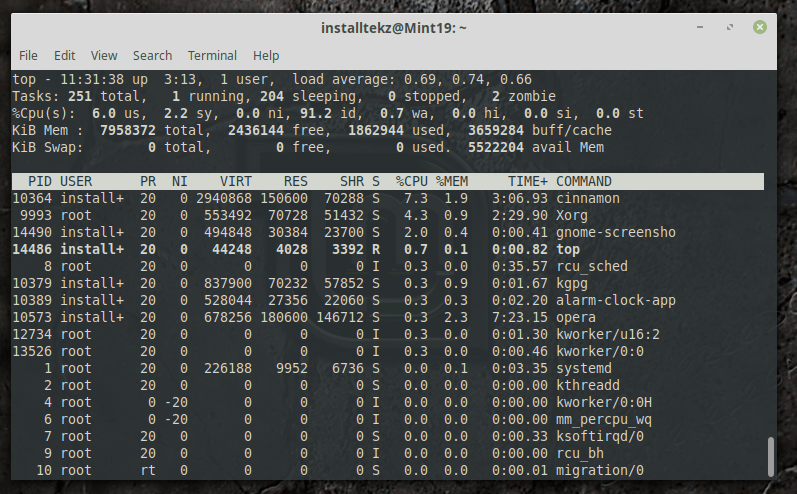
 

Load Average

The load average is formulated by using a whole bunch of different resources such as CPU and memory.

The way that the load average is displayed will need to be memorised by you as it’s output is not very clear. We see three numbers, each number having two decimal places. 


The first number indicates the load average over the last MINUTE, the second number indicates the load average over the LAST 5 MINUTES and the third number indicates the load average over the PAST 15 MINUTES.


If we notice any of these numbers starting to increase then this would indicate a problem somewhere in our processes.

We can use the past minute, 5 minutes and 15 minutes to get an idea of how often we are getting these high loads on the system.


Note that the amount of CPU’s and CPU cores in your computer would help determine the final result of the load average result. 

6. The 'free' Command

free command
Output of the 'free' command

The ‘free’ command will display our memory usage.

If we execute the command:

free 

do you notice something familiar? The output from the ‘free’ command is similar to the top of the output from the ‘top’ command.


It displays the total RAM memory in megabytes, how much of this RAM is actually being used, and how much of that memory is free.


When linux applications are open and held in RAM, some of these applications are used by multiple users. This is what “shared” is referring too here.

The output also displays the “buffers” and “cached” memory.

Swap

The output of the ‘free’ command will also display to us the swap memory. Swap memory is part of the hard drive that is used whenever the RAM is filled up and so it acts as kind of a safety net for us.


Using flash memory as a RAM alternative slows our computer to it’s knees because flash memory is no where near as fast as RAM, and so we would want to keep the use of swap memory down to a minimum.


In linux, we usually create a separate, dedicated partition on the hard drive for swap space. In the Windows world, this swap space is kept on the same partition as the operating system.

Conclusion

This post covered the LPIC1 certification topic on how to “create, monitor and kill processes in linux”.


Here I covered the following commands and I would certainly make sure I know all of these before sitting the exam:

  • fg and bg
  • Backgrounding a job with ‘&’
  • nohup (begin a command with ‘nohup’ and end it with ‘&’ to background a job and logout)
  • kill
  • killall
  • Briefly talked about signals 15 (SIGTERM) and 9 (SIGKILL) and how these can be performed from within the ‘top’ command.
  • uptime with load averages
  • ps and top
  • free (viewing memory)

Now that we know how to start and stop jobs, we can move on to changing these job priorities here

Resources:
A helpful resource can be found Here for a Question and Answer guide to help you pass the LPIC-1 certification!

installtekz icon

Quote Of The Day

installtekz

"When wireless is perfectly applied, the whole earth will be converted into a huge brain..." - Nikola Tesla, 1926

How useful was this post?

Click on a star to rate it!

Average rating 5 / 5. Vote count: 1

No votes so far! Be the first to rate this post.

Leave a Reply

Your email address will not be published.