How Do I Create An IoT App For Android Using Kodular?

mobile apps
5
(1)

How do I create an IoT app for Android? I use Kodular.io of course!

So you want to build an Android app but you’re not a programmer? Then this post is for you!

I won’t be covering how to make money from apps or how to submit apps in to the app stores here in this post as that’s a whole other topic.

Here I will cover just how to create an IoT android app for yourself. we need to walk before we can run, right?

In my post ‘How To Build An IOT System Under $100‘ I talk briefly on mobile app development for non-developers.


I will cover in more detail on how you can build your very own app right here!

As with many things in technology, these app platforms are changing quite dramatically over time.

Many new features are added, bugs are fixed and sometimes whole platforms move!


Appybuilder was my platform of choice but the whole team have moved over and joined Kodular.

I still see people today joining Appybuilder and complaining that the build server doesn’t work.. this is because Appybuilder is in the process of being decommissioned!

I just hope Kodular stays around for a while.. I guess only time will tell!

Let’s get to it!

Contents

Getting Started

Low-tech Pencil & Paper

How do I create an IoT app? We start low-tech.

The first thing I would suggest to anyone who is starting out with building a mobile app is to plan it all out by drawing diagrams and notes on to paper first.

Even if you’re only creating a small app, it’s a good idea to get into this habit.

This is something that I’ve learned from experience many times over in the past.

The problem here is that you could spend hours or even days working on a particular function only to find yourself cornered somehow.

Then you realise you need to return back to the design phase and all that developing was a waste of time!

app design
Designing The Layout Of Screens

The thing is, when we build an app on our own, we are not only the developer, but we are also the designer and the tester.

After every piece of functionality that you build, it’s a good idea to do some kind of functional testing at the very least as any problems later down the line will be easier to find.


You will thank yourself later for planning, planning and more planning before you begin to execute! Draw out your screens, plan the navigation and buttons. Ask yourself the question: “How will it all work?”

Realistic Goals As A Beginner

You’re not going to build the next Facebook app in your very first app project. There’s so many components that go into sophisticated apps.

I suggest to you to come up with a simple app idea that doesn’t include anything community based for example. These kinds of projects will require cloud platforms at the very least.


You would also need to to design a whole system, including networking possibly and don’t forget security.

Keep it simple, basic and realistic. It’s good to think about where your app could end up in the future, what kind of cool functionality that your app will have.


We can always build on to our app at a later date by implementing new functionality, but the key here is to create what we call “minimum viable product”. Just get the thing working in it’s most basic form first.

FREE Download: CIoTP Checklist!


The ‘Certified Internet of Things Practitioner’ Certification provided by CertNexus is an excellent blueprint to begin learning IoT.

To download your CIoTP PDF CheckList file Click Here
CIoTP checklist

Sign Up

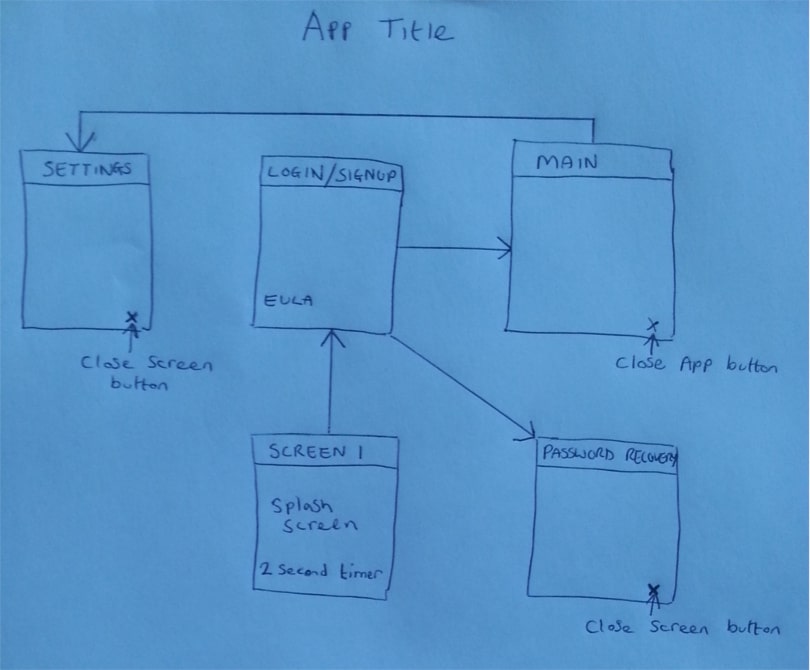
I would suggest one of two ways that you could follow along with the rest of this post. The first route would be to take the ‘App Inventor 2’ route.

The second option would be to take the Kodular route. I will be covering Kodular here, but be aware that Kodular has much more to offer than App Inventor 2.


The problem here is that it may be a little daunting for a new beginner. So if you want something very basic then go for App Inventor 2.

If you want to begin with more options available to you then choose Kodular.

It’s worth noting here that App Inventor 2, Kodular, Thunkable and many other platforms all work in a very similar way.


In fact, with basic apps it’s possible to move your project from one of these platforms over to another.

Although I wouldn’t recommend doing this very often if possible as problems are bound to arise somewhere.


At the time of writing this, Kodular and App Inventor 2 are only for Android but IOS app developing has been in the pipeline for some time now. Who knows if or when this will be incorporated into these online platforms.

kodular icon
Kodular
ai2 icon
App Inventor 2

So get yourself over to either AI2 or Kodular and create an account.

I believe these platforms usually require a Google account to sign up.


From here on in I will be covering Kodular, but if you choose AI2 route then you should still be able to follow along without any problems.

Start A Project

Once you get your account created with Kodular then simply create a new project and give it a name.

It’s worth noting here that your project name is not set in stone at this point.


If you haven’t thought of the perfect name for your app here then it doesn’t matter as it can always be changed in the future.

I usually start out with a “code name” at this point. This is usually something descriptive or maybe a name that I think I might call it.

Two Editor Modes

How do I create an IoT app in Kodular? We need to know about the two modes first of all.

When we build an Android app in Kodular there’s two main editors that we will find ourselves switching between through the course of developing our app.

These are the Design Editor and the Blocks Editor.

Design Editor

The design editor is where we would place down components in to our project.

These could be checkboxes, buttons, labels etc.


In fact there’s a huge palette full of components for you to discover and practice playing around with but I will discuss this further down this post in the ”Components” section below.


When we place these components on to the device screen we are given a visual representation of what our app will look like.


But please note that this layout is just a guide.


When you actually run the app on your device you may notice that in reality, the app looks a little different to what you see in Kodular.


Only after you spend countless hours practicing and testing components will you truly get a feel for what you app will look like.

Blocks Editor

After we’ve placed down some components in the design editor we can then switch over to the blocks editor.

Here we can also drag and drop components from the left of the screen and on to the work area on the right.


Many of the components (or blocks) are either from the components that we placed down in the design editor, or blocks for generic device functionality, such as closing the app, or run some code when the screen initialises.


Components

How do I create an IoT app in Kodular? Well the next thing we need to know about are the components.

The amount of components to choose from in Kodular is epic but don’t let this put you off.

Yes, it will take you lots of time to get familiar with these components and discovering what these components are capable of doing is half of the fun, no?


Sensors

In a mobile device then we have a ton of sensors that we can use in our apps.

Sensors such as proximity, accelerometer, gravity, gyroscope, hygrometer, light sensor, pedometer, pressure sensor and more!

And this is just one set of components that we can utilise from Kodular.

Screens

How do I create an IoT app? After learning about the components we now need to know about screens!

No matter how big or small our app may be, we don’t want to be using a huge amount of screens though.


I think that the maximum recommended amount of screens to use in Kodular is 10 but I would recommend aiming for 9 or below, just to be safe.


It has been known to cause problems when using too many screens while building your apps in Kodular.

When we first start our new project we will have 1 default screen called “Screen 1”.

The name of this screen cannot be renamed or deleted and this screen is the first screen to be opened every time our app begins to run.


We can use “Screen 1” to then open up another screen that we have created.


I usually use “Screen 1” as a splash screen that will show some kind of logo for around 1 second or 2 before automatically opening up another screen (this is done by using the clock “sensor” component).

Of course we can always add and delete screens as and when we want.

TIP: If you have a screen opened but you want to return to a previous screen then DON’T OPEN the other screen.

What you need to do here is CLOSE the present screen that you have open and this will return you to the parent screen.

If you don’t build your app this way then you will end up with screens opened multiple times and the project becomes very messy, very quickly!

Create Icon & Other Graphics

How do I create an IoT app in Kodular? Well we now need to talk about graphic assets.


If you’re familiar with Photoshop then great.. stick with it would be my advice as there’s no need to begin learning a new alternative for app creating.


We have lot’s to learn already without having to learn a new image editing tool too!


However, if you’re like me and run everything from linux and support free and open-source software then GIMP would be a tool you may want to start using.

GIMP icon creation
Creating An Icon In GIMP

GIMP has a huge variety of tools available and we won’t need to learn everything here. YouTube video’s help greatly in learning how to perform many actions.

To create the main icon for your app then you will need a canvas of 512 pixels by 512 pixels (512px x 512px).

You will probably want some kind of transparent background to make it look pretty too.

GIMP icon creation
Example Icon In GIMP

colors

If you’re going to build an Android app then you’ll certainly be wanting some cool colors at your disposal.

For this I can highly recommend the site colourlovers.com.

Just enter a name of a color in the search box and you will be presented with some palettes for you to choose from.


You can click on a color that you like and you will be given the hexadecimal number for that particular color.

If you don’t already know by now, colors in computers are generally identified by hexadecimal numbers (0-9 and A-F) and start with the ‘#’ symbol.

colourlovers example
Example Screenshot from Colourlovers.com

A great tool that I always use in linux for saving my favourite colors is Gpick.

 This tool should be in your linux distributions repository and easy to search for or you can install it with the following command on a Debian-based distro (Ubuntu, Mint, Debian etc.):

sudo apt install gpick 

and enter your root password.

Gpick in linux
Gpick tool in Linux

There’s more ways than one to enter colors in Gpick and I will guide you here on the simplest way that works best for me:


  • Click on one of the colors/numbers from 1 through to 6 under the “Pick Color” section in the top left corner of the graphical interface.
  • Then move your cursor and hover over a color on screen that you would like to save and press the space bar.
  • You will then notice that your chosen color has been saved in Gpick. 

Testing

There’s a couple of different ways that we can begin to test our app in Kodular.

We don’t need a fully completed app before we can begin to test.

In fact, I would recommend testing your app every once in a while, when adding a new feature for example.

kodular testing

The screenshot to the left shows two ways that we can test our app.

We can install the Companion App from the Google Play store which we would use to scan a QR code or manually enter a code. The other way that we can test our app is through a USB cable.

Before we select the test option of choice, be sure to either have the Companion app opened up and ready if your using the “Companion” option, or have your cable connected ready if your going down the “Connect Via USB” option.


Another form of testing is to actually build the app and install it.


This process does however take up more time but I found that many issues arise if the app is not built and installed.


For simply admiring the design of your app on an actual mobile device screen then the testing methods are perfectly fine to use.


I would also recommend using the Companion App which uses your Wifi network rather than using a cable. But that’s just my personal opinion.

Extensions

If the sheer amount of components that are built in to Kodular isn’t enough, we can also import third party components in to our projects.

We call these extensions.


There’s many places on the net where we can download these extensions and they’re usually created by indie developers from around the world.

Sometimes these extensions are free, and others may require a small fee from you to purchase.


This all depends on the developer of course and some of these extensions are likely to have taken quite some time to create.


Check out PuraVidaApps.com for a collection of some cool extensions to add to your Kodular app projects!


Below is a screenshot of just some of the extensions that I have ready to go when ever I may need them. All of these were acquired from PuraVidaApps.com

kodular extensions
Extensions such as Arduino help us alot in creating IOT apps

Community

The community is a big place in Kodular as there’s always someone available and ready to answer any questions that you may have or help you out with any problems.

You can also show off your apps to others if you want to.

I would recommend visiting the Community page regularly to be notified about any changes and other latest news around the project as a whole.

Download

Linux Bash Script: Automated App Project Organizer

When you start creating apps you will inevitably get those “light bulb” moments of app ideas that you would love to build.


Here I have a linux bash script that will create a tree-like directory structure with files.


When ever I think of a new app idea I would run this script.


The script will ask you for a name then go ahead and create the files and directories ready for you so you don’t need to keep re-inventing the wheel whenever you want to create a new app.

Script Structure
Screenshot Showing App Organzier Script Output

If you would like this script then you can grab it by either running the following command from a terminal or hitting the ”Download” button below:

wget https://installtekz.com/downloads/app_dev_template_setup.sh 

Once you have the script you can make it executable with the following:

chmod +x app_dev_template_setup.sh 

Then simply run it:

./app_dev_template_setup.sh 

Conclusion

Hopefully by now you’re not thinking “How do I create an IoT app?” after reading this post.

There’s a lot to take in here and only practice will get you where you want to be.

There’s so much to learn when creating apps and I have probably only just covered the basics of what you will need to get you going.

You will certainly start having fun and thinking of so many possibilities of what to create next.

If you would like a very basic IoT project to develop your skills on then why not try following this guide.

Here I demonstrate the control of an LED on Arduino over bluetooth by using a FREE Kodular app supplied by me!

Good luck with your builds!

installtekz icon

Quote Of The Day

installtekz

"When wireless is perfectly applied, the whole earth will be converted into a huge brain..." - Nikola Tesla, 1926

How useful was this post?

Click on a star to rate it!

Average rating 5 / 5. Vote count: 1

No votes so far! Be the first to rate this post.

Leave a Reply

Your email address will not be published.