What The Heck Is ARDUINO? 10 Step Dummies Guide!

What Is Arduino
5
(1)

What the heck is Arduino?

Well grab a coffee because we’re about to find out!


There’s not many guarantee’s in this world but once you have a good understanding about this little device and know what it’s capable of, then you will almost certainly want to start creating your very own projects right away.


what the heck is arduino project

I’m not going to go over all the technical specifications here and sound like every other website that explains Arduino like a robot, but if you’re interested in electronics and programming then this is the ideal hobby to get in to as it offers you everything on a plate (so to speak) and at a very cheap price.


The number of practical projects that this board can accomplish will blow your mind. Don’t believe me? Check out the official Arduino project hub here and see what others have been creating.


Still wondering what the heck I’m talking about? Read on and I will cover as much as I can as an overview for the beginner.

Contents

1. So, What The Heck Is Arduino?

Arduino is a small circuit board (That’s it! It’s as simple as that) that originates from Italy and I believe it’s named after a small bar somewhere in the country.


We can program the Arduino to make electronic input components (such as light sensors) and outputs (such as lights) work in any way we want.


For example then, we can create a project that will turn on a light when the sun goes down, and turn it’s self off again when the sun rises.


This is just one (very basic) function that we can perform and the possibilities really are endless. 


Components

The Arduino on it’s own can’t do much at all except for making an LED light blink on and off (which is great for testing purposes) which comes built-in to the board, but if we want to create awesome projects then we are going to need some extra electronic components.


INPUTS

Input components usually consist of many different kinds of switches and sensors.

We can sense temperature, humidity, visual light, infra-red light, sound and heat for example and switches can be either manually controlled, or we could use a proximity or pressure switch too.

temperature sensor
Temperature Sensor
moisture sensor
Soil Moisture Sensor
smoke detection
Smoke Sensor

OUTPUTS

Various electronic output components can also be used in our projects and these could consist of lights, motors, pumps, solenoids (used for an electronic controlled lock for example) speakers or heating elements. 


heating element
Heating Element
electronic motor
Motor
LED light
LED Light

We could also use relays that act like an electronic switch that would apply a higher wattage to a circuit that requires more power.

For example, we could use our small, low powered Arduino to switch a high voltage mains powered lamp on and off.

2. Where Is Arduino Used?

This board is mainly used by hobbyists who enjoy working with programming and electronics.

Because Arduino is so versatile, there are many applications in which it can be used and all it takes is a good idea. 


You can create your own project with no help at all, but there’s so many projects online from others where you could easily take their designs and build from there.

You could even modify the design to suit your own needs too.

FREE Download: CIoTP Checklist!


The ‘Certified Internet of Things Practitioner’ Certification provided by CertNexus is an excellent blueprint to begin learning IoT.

To download your CIoTP PDF CheckList file Click Here
CIoTP checklist

IOT

As the ‘Internet Of Things’ becomes more popular over time, the Arduino would be an excellent choice of prototyping board for creating. projects.

It’s great for automation, has a low cost, and is highly configurable due to it’s nature of being open-source.


There isn’t much of a need for these kinds of projects for most people other than the hobbyist.

Arduino could possibly be used by Engineers to create bespoke systems in the work place too for example.

3. What The Heck Can I Do With An Arduino?

People are coming up with new ideas all the time but here is a list of possible uses:

  • Keyless door locks
  • Open curtains or blinds when the sun comes up and close them again at night
  • Watering plants when the soil dries up
  • Building robots and drones
  • Creating electronic games
  • Electronic signs
  • Other home automation projects
As I mentioned earlier, you can check out the Arduino project hub here to see what people have been creating and maybe follow along with a project too.
arduino circuit

4. What Is The Advantage Of Using Arduino?

Readily Available

All of the needed external electronic components are easily bought from a local electronics component store.


In fact, the Arduino it’s self is built from these COTS (Commercial Off-The-Shelf) components too and it’s possible for the average Joe to build their own Arduino! This is what we call open source hardware.


The creators of Arduino didn’t invent it, they simply took all of the needed parts, put them together and made it easy and cheap for us to start building bigger projects.


arduino board

Cost

Because Arduino uses these readily available COTS parts, it means that the cost of the Arduino it’s self is low cost. Cheap to build, cheap to buy.

Community

The community for Arduino is HUGE on the net.

It’s always possible to pitch your project to the community and receive some feedback and design ideas.


There’s always people wanting to show-off their capabilities so if you’re lucky you will most likely find someone to design you a project too or point you to an existing project.

5. How The Heck Do I Learn Arduino?

The best place to start is over at Arduino.cc. You will need to install the IDE (Integrated Development Environment) software program which is available for Windows, Linux and MacOS although they also offer an online version too.


The Arduino is programmed using the C and C++ programming language.


All you need to do is learn the basics of C or C++ by watching some Youtube videos as programming languages are taught almost everywhere.

c programming

I can recommend a Youtuber called Bucky who is great at teaching languages. His channel can be found as TheNewBoston.

Here is his playlist for the C language and here is his playlist for the C++ language.


As well as getting the basics down, I would then recommend looking at other peoples projects at Arduino.cc and follow along with creating a project and you will soon find that you start to understand the C program.

Why not experiment and change some values in someone else’s code?

Depending on what project you choose to build, some basic electronics will most likely be needed.


I would certainly study how the basic input and output components work so that you can start to create projects straight away.

I would also recommend learning how resistors work and Ohm’s Law.

You will of course need an Arduino board.


Because there are many different types of Arduino boards available, the most common board for anyone is the Arduino Uno.


But there some things you will need to know before buying your board and I will go over these further down this post too.

6. What The Heck Is An Arduino Shield?

Sometimes when we build an Arduino project, we need extra capabilities that the Arduino can not do. This is where shields can be used.

Shields come in many different shapes and sizes.

Usually a shield is designed to give us one piece of extra functionality only, and so if you want your Arduino to do many things then it may be required for you to add many shields to your project at the same time.


Shields are either official, meaning that the Arduino team have created these themselves, or unofficial. Unofficial Arduino shields are created by hobbyists and enthusiasts.


It would most likely not be possible for unofficial shields to exist if it wasn’t for the fact that the Arduino team created the Arduino as open source hardware.

arduino with ethernet shield
Arduino Uno with Ethernet Shield

The above image shows an Arduino Uno with an ethernet shield. By extending our Arduino in this way, we can now use our Arduino on a TCP/IP network and this extends our functionality of the Arduino even further.


With this setup we can now control our Arduino over a computer network and even over the internet. 


Of course there are many other shields out in the wild and here is a list of some other shields that can be found:

  • GPS
  • GPRS (mobile phone network)
  • Adding touch screens
  • Motor controllers
  • Wifi
  • Bluetooth

The Arduino Uno is very basic and is a good choice for the absolute beginner. But note that some other Arduino boards may have some of these extra capabilities built-in and I will go over some of these boards in the next section.


Header Pins

Sometimes Arduino shields are not directly plugged in to the Arduino it’s self by using what we call header pins, but instead is connected to the Arduino using wires. I would tend to call this setup as an “off-board” shield.

header pins

The following image shows a ‘motor controller’ expansion board which is not directly plugged into the Arduino by using header pins, but instead mounted off-board on what we call “breadboard” (The white thing with holes in).

arduino motor controller
Example of an "off-board" Shield

7. Why The Heck Are There So Many Types Of Arduino?

There seems to be a new Arduino board released as time goes on and to a beginner this may seem very daunting as to which board you should choose to purchase for your very first project.


Because there seems to be an infinite amount of projects to build, each having different capabilities, you may want to use a board that suits your needs best and so many board types exist under the Arduino family.

Arduino Uno
The Arduino Uno Is Most Common

Here are just a few examples of why you may need to choose one board over another:


Basics

My advice would be to get the Arduino Uno whether you have a project in mind or not, as this board is very basic and can be used as a good training aid for building basic projects and become familiar with the whole process of micro-controller circuits.


IOT

If you’re looking to get into Internet Of Things (IOT) projects then choosing a prototyping board with a TCP/IP stack and Wifi capability would be a good choice, although shields can be used to extend capabilities too.

Embedded Linux

The Arduino Yun board is one of these IOT boards and it supports embedded linux.

This allows you to write linux shell scripts or even Python programming to bring your IOT projects to life.

If you would like to learn linux then try following along with some of my linux posts here for beginner’s.

linux logo with tux

Bigger Projects

Sometimes the Arduino Uno may not have enough room to fit your whole project on if you’re building a bigger, more complex system.


A good choice in this situation would be to use the Arduino 2560 as this supports much more connections.


The more features you require from your Arduino will also affect the price of the board also.


The cost of a project is usually a big factor in which board you will choose as not all of us have an unlimited budget when it comes to building projects such as this.

If you’re interested in finding out more then checkout Arduino’s main page here to see what products they offer.

8. Is It Illegal To Copy/Clone Arduino?

Any electronic components or electronic devices that can be bought freely by anyone is known as Commercial Off-The-Shelf Components or COTS for short.

As mentioned before, Arduino is open-source hardware. With these two factors then, it’s very easy to re-create an Arduino board at home.


From what I gather, this is perfectly legal. However, legal issues may arise if you re-create the board and use the Arduino name.

That is if you print “Arduino” on the circuit board and you sell the item as an official Arduino board then this is known as a fake Arduino and most certainly illegal.

arduino logo
Arduino Logo

Many Arduino “clones” can be freely re-created and sold but to stay within the law, the seller must not use the Arduino name.


If you look at the description of one of these boards on Amazon or Ebay for example and it states that it is a “Compatible” then this is most likely NOT a genuine Arduino board.


I believe the correct term for one of these Arduino compatible boards would be “FreeDuino” and the Arduino company would rather this term is used for any copies/clones of the device.


Apparently Arduino used a small gold component that they manufacture themselves and this is used to distinguish a genuine Arduino board from a fake or cloned/copied board.


genuine arduino
Genuine Arduino With Gold Component
freeduino
Legal, Non-genuine, Arduino compatible (Freeduino)
fake arduino
Possibly Illegal, Non-genuine Fake Arduino

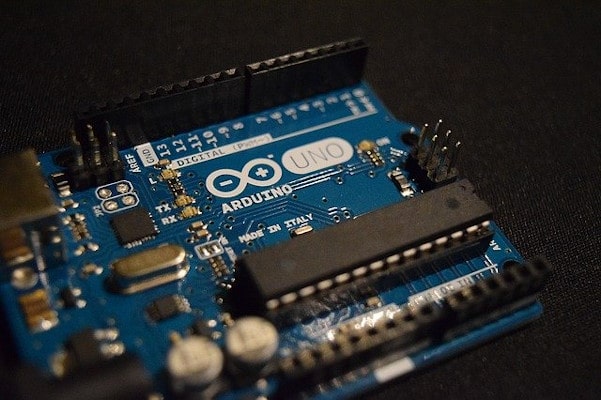
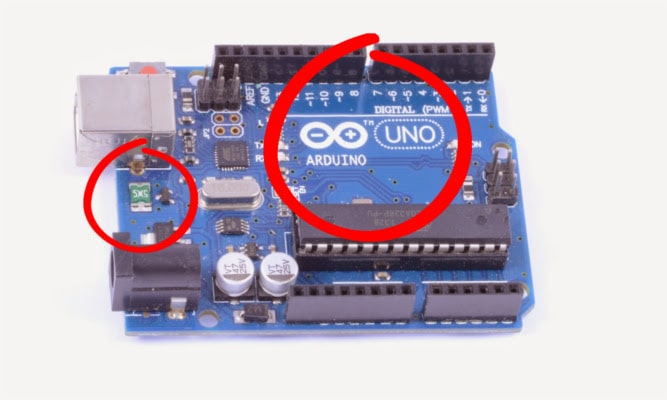
By looking at the above images, the image on the left is a genuine Arduino board. Notice the gold component in the red circle.


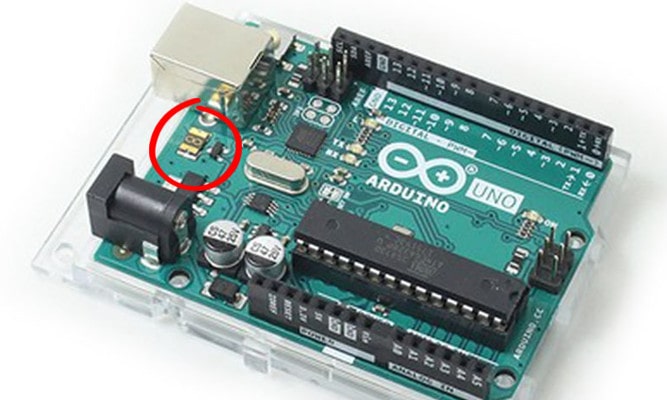
The centre image is an Arduino copy but it’s not using the Arduino name. Because no copyright infringement is taking place, this board is legal.


It may show Freeduino, a company name (other than Arduino) or no markings what so ever.


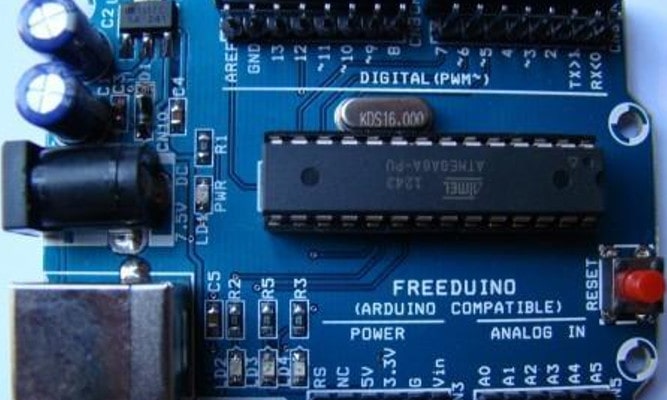
The Non-genuine, fake Arduino image on the right is in copyright infringement because it has “Arduino” printed on it and may be deemed illegal.


These are very hard to spot in most cases but if you click the far right image to enhance it, do you see how the fake board use the green component?

9. How The Heck Do I Use Arduino?

Basic Board

To begin learning Arduino then I would certainly recommend getting an Arduino Uno first of all for practicing on and developing your skills and knowledge with.


The Uno is by far the most common board in the family and is always considered as the beginner’s board.


The features are limited with the Uno but the price tag reflects this, and so if you do not have a specific project in mind, then the Uno would be the best place for a beginner to start.

 
Arduino Uno

Other’s Projects

Other than that, what better way to learn new technology than by creating your very own project, right?


I would start by finding a project online that I want to build and follow along with someone else’s creation.

These usually consist of the C source code, circuit design and layout for you to copy from.

Extra Hardware

Of course if you want to build an Arduino project then you’re going to need more than just the Arduino board its self.

I will go over my recommended parts list in the next section about building your own starter kit for a beginner.

Arduino IDE

The Arduino IDE (Integrated Development Environment) is a software program that is available for many operating systems (we call this cross-platform).

The IDE is where we will write our programming code.

Arduino IDE
Arduino IDE (Software)

This is done in the C/C++ programming language and in the Arduino world we call this a sketch.

Once we are happy with our sketch we would then use the IDE to ‘compile’ our source code. This means that the program is made into an executable program.

After compiling is complete, our newly created program is then ‘flashed’ into the Arduino micro-controller chip.


All of this is done from the Arduino IDE program and because of this hard work has been taken care of for you, it let’s you concentrate on your project rather than the complex process of programming the Arduino board.


The official Arduino website now offers an online editor too! This is known as a ‘web app’.

I haven’t personally used this myself and unless it offers features that isn’t available in the installer IDE then I’m unlikely to use it.


But I never say never!

what the heck is arduino project

Laptop/PC

You will also need a PC/laptop/Mac as the Arduino IDE is created for Windows, Linux & Mac.


Your chosen system will need a spare USB socket as this is where we will be flashing the micro-controller in the Arduino board.

10. How To Build Your Own Arduino Starter Kit

Below is a list of parts that I’ve found on Amazon. 

These parts are what I would certainly consider to be very basic components for anyone who is wanting to create any Arduino project.


And certainly for beginner’s who will most likely spend some time tinkering around with various simple projects.

This is what I call, “The Arduino Arsenal”.


When I see “Arduino Starter Kits” online, I usually see components that I would not consider to be part of a starter kit and those things are WAY over-priced anyway.

Electronic Components

I would recommend buying all the parts separately and create your very own “kit”.

I’ve chosen the ‘non-soldering’ option here as this allows you to get comfortable with quickly building projects that are non-permanent (for prototyping).


If you want a more durable, permanent project then you can always solder and create printed Circuit Boards (PCB’s) at a later date when you feel more comfortable doing so.

BOARD

Of course, you will need an Arduino board. The choice is yours, but here is a link to an Uno on Amazon.

Aim for ordering an Arduino that ships with a USB cable. This is needed to flash/program the Arduino and are usually seen in blue. Also Aim for ‘R3’ (Revision 3), as this is a later design.


Don’t forget that the OFFICIAL Arduino boards will have a higher price tag than the unofficial copies.

Just watch out for the Arduino fakes with the same price tag as the official Arduino boards here though. (Although they will most likely still work OK. But no one likes to see others get ripped off!).

cost

GENERAL TOOLS & EQUIPMENT

My ‘basic hand tools‘ post covers exactly that. All of the basic tools that you will need to begin constructing electronic circuits.

I’ve also added some basic electronic components and equipment that any electronics enthusiast will need to begin building circuits.

The following list describes some extra components which you may need for Arduino specific project construction:

ARDUINO SPECIFIC PARTS

Male-to-Male jumper wires

Male-to-Female jumper wires

Female-to-Female jumper wires

PP3 battery snap WITH Arduino power plug (Needed if you’re avoiding any soldering)

Arduino case or potting box (link is used as an example here)

Nylon nuts and stand-off pillars (Usually only needed with potting box)

You may also require any input and/or output components but this will depend on your project. This could be LDR (Light sensor), temperature sensor, motor etc.

Conclusion

Still here..?

If I asked you the question “What the heck is Arduino?” Could you tell me?

question

I hope I’ve covered everything that you need to know about the very basics of Arduino and how to get started.


But this is just the beginning.


This is a really fun and educational way of learning embedded programming and electronics and once you get started you will learn more as you go along.

If you’re planning to create an Arduino project then I guarantee you won’t be disappointed, even if it’s purely for educational purposes only.


Once you see the potential that these projects can bring then you will be planning one project after another as it does get very addictive.


Why not try some cool entertainment projects or perhaps a little garden automation?

For newbies I recommend following a basic guide such as my Arduino to Android via bluetooth communication project to get your hands dirty.


Take care and have fun!

installtekz icon

Quote Of The Day

installtekz

"When wireless is perfectly applied, the whole earth will be converted into a huge brain..." - Nikola Tesla, 1926

How useful was this post?

Click on a star to rate it!

Average rating 5 / 5. Vote count: 1

No votes so far! Be the first to rate this post.

Leave a Reply

Your email address will not be published.