What The Heck Is BIOS? 11 Steps For Beginner’s

0
(0)

Just what the heck is BIOS?

Grab yourself a coffee.. you’re going to need it!


In this post I’ll cover just exactly what BIOS is and what you need to know about it if you want to learn computing.


Studying the BIOS may seem like it’s a subject belonging to PC maintenance (and that’s because it is) but the knowledge on this subject is also needed for installing operating systems.


So whether you’re into hardware or software, you will certainly benefit from understanding how the BIOS operates.

Are you ready?! 🙂

Contents

1. What Is BIOS Made Up Of?

The image on the left below, shows a BIOS ROM chip and the image on the right shows the BIOS firmware output on a standard PC.

integrated circuit
BIOS ROM IC
BIOS booting
PC BIOS Boot Output

BIOS (Basic Input Output System) is made up of various parts.

Firstly it is a software program. This program is stored on a chip.


The correct term for an electronic chip is “Integrated Circuit (or ‘IC’ for short).”

When ever we store software embedded in an electronic chip we usually call this firmware.

2. Where Is BIOS Found?

BIOS is usually found in a computer, whether it’s a PC, laptop, games console etc.

In a typical PC we usually have a motherboard and maybe even some expansion cards.


All of the expansion cards will have a BIOS ROM chip on each of them and so does the motherboard.

When we hear the term BIOS, by default we are usually referring to the BIOS on a PC motherboard.


But please be aware that all other expansion cards in a PC, along with laptops and games consoles also have a BIOS too.

This post will focus ONLY on a PC motherboard BIOS!

PC Motherboard BIOS'es

bios chip
bios chip
bios chip

BIOS’es are created by many different manufacturing vendors and come in various different shapes and sizes.


The top three images show the most popular BIOS manufacturers that I have seen. (Award, Phoenix & American Megatrends).

3. What Is BIOS Used For & Why It's Important?

The BIOS has two main jobs that it needs to perform.

First it will perform a ‘Power On Self Test’ (POST for short), then it will load the operating system in to memory (RAM or Random Access Memory).

POST

When we first switch our computer on, the BIOS performs something called a POST or Power On Self Test.


The POST performs some basic checks around the system and looks for any problems.


Sometimes these problems are so major that the POST will stop the computer from doing anything else such as continue to boot up the operating system.

BIOS Beep Codes

When a fault is found by the BIOS, whether it’s a big or small problem, the BIOS will send beep codes to the in-built computer loudspeaker.


Have you ever heard your PC make a beep noise when you turn it on?


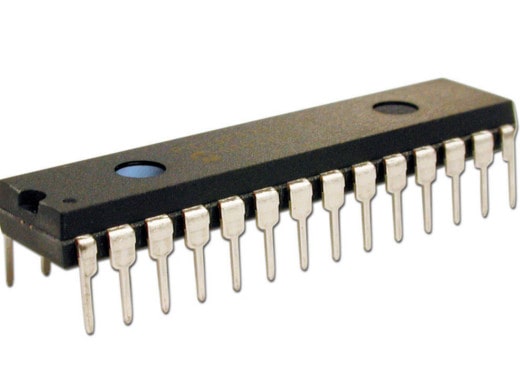
The only way to decode the beep patterns is first of all by identifying what BIOS manufacturer you have.


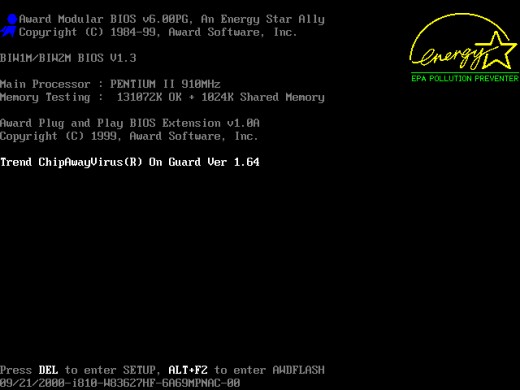
This can be done by looking at the black screen with white text that appears for a split second when the computer is first switched on.


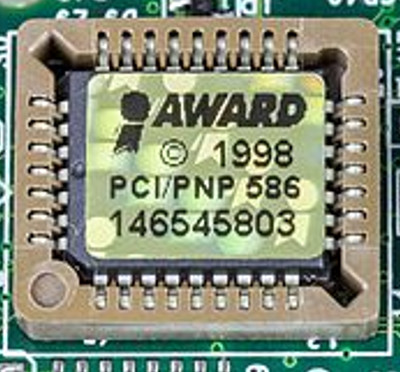
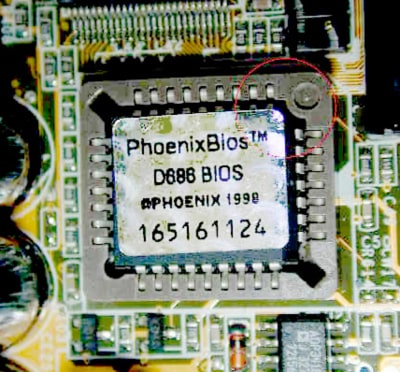
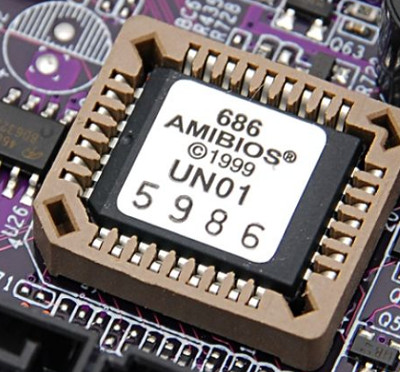
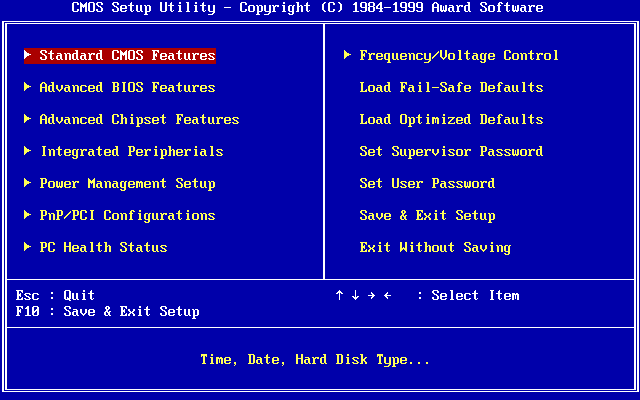
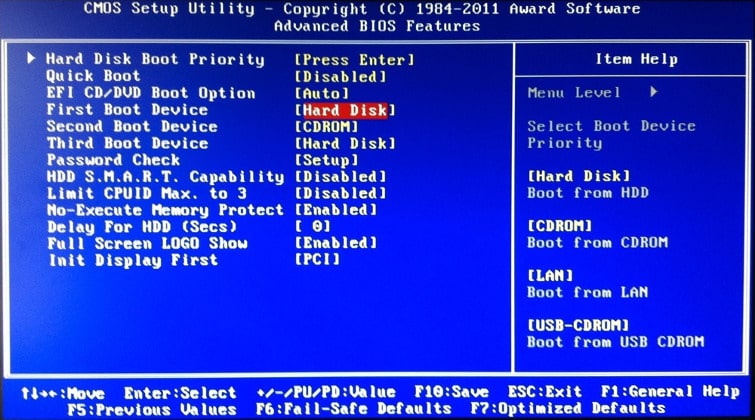
Some of the top BIOS brands are AMI (American Megatrends Inc), Phoenix and Award as I mentioned earlier.


Once we have identified our BIOS manufacturer we then would perform a ‘search engine’ search for that BIOS manufacturers “BIOS beep codes”. For example: “Award BIOS beep codes”.


It’s similar to decrypting morse code here as we may have 1 long beep followed by 2 short beeps, or something like 1 short beep followed by 1 long beep.

But by looking at the BIOS beep code chart for the manufacturer will give is the answer to what problem the BIOS POST has found.


An example of a BIOS POST fault would be if a RAM memory module wasn’t inserted into the motherboard RAM slot correctly.

This has happened to me on quite a few occasions after tinkering around building a PC.

Load OS into RAM

Once our BIOS has performed a POST and assuming it finds no “show stopper” faults, then the BIOS will load the operating system in to RAM.

Once the operating system is ready, the BIOS hands over control to the operating system and the BIOS’es boot up job is done.

4. Legacy BIOS & UEFI

Ever since personal computing began, PC’s have used a BIOS.

Over time there’s been many new features incorporated into many different BIOS’es but the basics have always been the same.. until UEFI was released.


Unified Extensible Firmware Interface (UEFI) was brought into existence to bring even more features to the user.

Computers are always changing and improving over time and I guess that some people decided that it was time for a BIOS over-haul.


When UEFI was released, what we once knew as ‘the BIOS’ is now termed as ‘legacy BIOS’.

Problems with UEFI

Even though UEFI has taken the new spot of BIOS, many people still prefer to use legacy BIOS and even manufacturers usually still support it.


Although UEFI DOES have some new features that’s never been seen in personal computing before, it is not without it’s problems.. and quite major problems too.

My Personal Experience With UEFI

A friend of a family member brought me a laptop to fix not so long ago. It was a Samsung Series 5 Notebook (2013).

In the past I have fixed many laptops in my time but this one was different.

I won’t go into all the details here now, but there were multiple things going on in this laptop that I’d never seen before.


However, I set about to install linux in this beautiful and stylish laptop and started doing some research on this device.

After reading many forum posts it was clear that there was a bug in the BIOS firmware created by Samsung and it was possible that this laptop may well have this bug.


This bug was so severe, that if an attempt to install linux on it, while the BIOS was set to UEFI mode, would completely brick the laptop! It would become an expensive paper weight. 


This is just one example of what problems are out there in the wild when it comes to using UEFI over legacy BIOS and my advice is to stick with legacy BIOS at least for the foreseeable future and save yourself lots of headaches.

5. Updating The BIOS / Performing A Flash (Advanced)

Flashing/updating The BIOS ROM Chip

The BIOS firmware is stored in a ROM (Read Only Memory) chip.


That means that the firmware/software is only readable and no writing can take place on the chip.


Sometimes we see the BIOS ROM IC called an EEPROM. This is ‘Electrically Erasable Progammable Read Only Memory’.

This just means that we can re-flash the BIOS with an alternative firmware.


Don’t get this confused with EPROM though.


Although this kind of chip still offers us the chance to flash in an alternative firmware, an EPROM’s memory is erased by exposing light to the top of the chip as it has a little window on the top.


Below is a visual side-by-side comparison of an EEPROM and EPROM.

EEPROM IC
EEPROM (Electrically Erasable)
EPROM (Uses light To Erase Memory)

Any BIOS settings are stored in the CMOS but I will cover that further down this post.


However, it is usually possible to perform an action called “flashing the BIOS”.


When manufacturers make computer hardware components they will write the software program for the BIOS and then write/flash this code to the BIOS chip. 

6. Why Perform A Flash? (Re-write Firmware)

Bugs in BIOS

Software/firmware does not always work perfectly, even from top software vendors.


Why do you think new software versions are constantly released even to this day?

In fact, there is no such thing as a fully tested and bug free program (as I had learned this from my software testing career).


But sometimes problems (bugs) are found in BIOS code long after the computers have been built and sold so there needed to be a way of updating the BIOS in the future.

Risks Of Flashing

A term commonly known as flashing, updating the BIOS isn’t a beginner’s task at all and most of the time it isn’t really necessary.


However if you want to gain more knowledge and experience with the BIOS then why not try updating/flashing it!

(Disclaimer: I will not be responsible for any action you take that results in BIOS flashing!)


A word of caution here: It is considered very risky to update the BIOS because if it doesn’t go to plan then there’s a big risk of breaking the whole motherboard!


As a beginner I would only recommend updating the BIOS on an old PC motherboard that you don’t really mind breaking.


However if you are experiencing a problem and you discover that there’s a bug in your BIOS firmware revision (version) then a BIOS update may well be needed.

Dummied-down BIOS

Another reason to update your BIOS would be to unlock more features.

Sometimes when we buy a PC, it is shipped with what is called ‘a dummied-down BIOS’.

Manufacturers & computer stores don’t want to waste money and time by fixing BIOS settings because you have been playing around in the settings and changing default stuff. 


Manufacturers will flash the dummied-down BIOS in, to reduce the chance of you and me from messing it up.


By upgrading the BIOS in this way, we can gain loads of extra functionality!

BIOS ROM Flash Advice

When I flash ANY ROM chip I always make sure that I have the correct BIOS update file (these are usually a .bin or a .img file) for my system and these are usually downloaded from the manufacturers website.


I would almost never get this file from an outside source unless it is some form of hacked version.


Once I’m confident that I have the correct BIOS file, it would be an excellent idea to run a checksum on the file and match it with the manufacturers checksum if they provide one.


This ensures that your copy of the file isn’t corrupt in any way. This is usually an md5sum or SHA hash but I won’t go into detail here about that now.


After making sure I have the correct BIOS image file, I will then make sure that if I am using a software utility program to flash the BIOS with, that it is also updated to the latest version.


This minimises the chance of software bugs that exist in the utility from introducing any problems.

Because problems is certainly not what we want when we are flashing a BIOS!


If there’s one piece of advice I would give anyone when flashing a BIOS, is NEVER kill the power to the device while it is performing the flash!

This will most likely result in what is known as.. ‘a brick’, which I will cover in the next section.

7. Problems With BIOS

What Is ‘Bricking’ (MAJOR BIOS Update Problem)

Bricking occurs when a BIOS update takes place and for some reason or another, goes horribly wrong.


Usually you won’t need to be concerned about bricking you BIOS unless you are performing an update.. then you certainly DO need to be concerned, as bricking the BIOS usually means that the WHOLE circuit board is now useless!


The only way to repair this would be to swap out the ROM IC for another, but to do this would require contacting the manufacturer who will most likely charge you a hefty price for the privilege.


Usually you won’t even be so lucky as to have the manufacturer help you on this and simply purchasing a new circuit board would most likely be a much cheaper option.


Be aware that there is a term in IT known as semi-bricking. This is where it would seem to be bricked but there is a way to recover. Usually though with regards to a BIOS this isn’t very common. 

Chip Creep

There may be a time when you turn your PC on and nothing seems to be working.

Not even the BIOS! You don’t see the black screen with white text, you don’t hear any BIOS beep code and nothing is displayed on the screen at all!


Do you ever hear people ask the question: Is it better to turn your computer off and on constantly or just leave the PC on constantly?

Well there’s a very rare problem with continuously cutting the power to the computer and that is called chip creep.


Chip creep is when the computer is continuously heated up and cooled down which makes the metal pins on the BIOS chip (and any other chip that is only fixed down in a socket rather than soldered in) contract and expand.


Over time this expanding and contracting actually physically moves the chip up and out of it’s socket!


Simply opening up the computer case and using your finger to press down firmly on any chips that reside in a socket will push it back into place and hopefully fix the problem.


Like I said, this is a rare occurrence but certainly something to be aware of.

8. What Is CMOS & Why Would I Want To RESET It?

cmos battery

CMOS Holds BIOS Settings

Because the BIOS firmware is stored in a ROM (Read Only Memory) chip, we cannot save any of our BIOS settings in this chip.


What we need is some memory to store these settings. This is where CMOS comes to hand.

So, Why The Battery & What Is The Battery Type?

CMOS (Complementary Metal-Oxide Semi-conductor) consists of a small lithium coin cell (battery) and it’s size is usually CR2032 at 3 volts.


Our BIOS settings are stored in volatile memory. Volatile memory needs power at all times because when the power is removed, the memory is wiped away (hence the term ‘volatile’).


This is why we need the battery because when we turn our computer off, we don’t want to be re-configuring our BIOS settings every time we turn the computer back on.


These batteries don’t last forever and usually need replacing every 5 years or less.

Usually the first indication that a CMOS battery is dead and needs replacing is when we either notice different output at boot up (during the BIOS POST output on screen) but mainly when our operating system boots up to the desktop and our clock is wrong.


Usually the clock will reset to the year that the motherboard was manufactured.


The clock will reset back to default because another purpose of the CMOS is to keep track of time.

It takes time from the system clock which is a small electronic crystal on the motherboard.

Why Reset CMOS?

Sometimes we like to play around in the BIOS and make changes to some settings (because we are curious by nature, right?) and these changes may render our computer from even working at all!


Simply by resetting the CMOS we can set the system back to a factory default state.


WARNING:

I’ve come across some systems where a simple CMOS reset did NOT work! 


The Samsung laptop that I had mentioned earlier certainly comes to mind again here.

Some vendors like to do things differently and not conform to standards.


This CAN, and WILL usually give you a bad day, but note that this is an exception to the general rule of resetting CMOS settings.

9. How To Reset The CMOS Settings

Resetting the CMOS is usually a very trivial task that only requires shorting out two electronic pins by using a jumper connector, or by removing and re-placing the internal battery.

cmos jumper

Positioning The Jumper component

The image above shows a 3 pin header on a PC motherboard with a blue jumper across 2 of those pins. Using this jumper component is the prefered method of resetting the CMOS memory.


Under normal operation, the jumper will be connected to pins 1 and 2.


To reset the CMOS then, what we need to do is remove that jumper and place it over pins 2 and 3.

After waiting for roughly 10 seconds (this timing may vary) we then remove the jumper again and place it back over pins 1 and 2 again. 


If we look closely on the motherboard we will notice white text and other markings. This is known as silkscreen.

There may be multiple jumpers on pin headers on a motherboard but use the silkscreen to identify ‘JBAT1’ (This marking may be different so I would recommend checking the motherboard manual if JBAT1 can’t be found).


The silkscreen should also identify which of the three pins are pins 1, 2 and 3. 

The centre pin will be used in either connection and so you may see a silkscreen label identifying ‘CLR’ or something similar which indicates the CLEAR pin.

Pull Out The Battery & Replace

If the CMOS jumper can’t be found or is difficult to get to then simply removing the battery from it’s holder for 10-30 seconds or so will perform the same action of wiping the BIOS settings clear from volatile memory.


You will most likely need a screwdriver, tweezers or other small tool to help with removing the battery.

Dead CMOS Battery

Of course if the CMOS battery is dead then simply replacing it with a new/fresh battery should be the only action needed here.

10. How To Change BIOS Settings

When you first turn on your PC you will see a screen that looks similar to the screenshot below.


Depending on what brand the BIOS is, we would usually need to press either the F2 key the DEL key or maybe some other key.


The correct key to press is usually displayed in the BIOS screen but you will need to be quick to see it as this screen doesn’t display this output for very long.


The screenshot below indicates that the DEL key needs to be pressed to enter ‘Setup’.

This screen also displays the vendor (Award) so usually the key to press for any Award BIOS’es will be the DEL key.


What I usually do here to get into the BIOS settings (Setup) first time around is to continuously press the F2 and DEL keys in an alternative fashion.


Not pressing the correct key at the correct time will result in the operating system to boot and so a reboot is required then the process starts all over again, which is very frustrating (who has time for that, right?).

BIOS booting

Extra Info: BIOS Flash Information

I just wanted to give you some extra knowledge here about BIOS flashing while I have the screenshot available above but please note that this has no relation to changing BIOS settings and feel free to skip this part if you wish.


As the screenshot states above, pressing the ALT+F2 keys together will take you to the BIOS flash setup.

Note the date in the bottom left corner? This is the current BIOS revision date. The long string of characters next to the date is the BIOS version. 


These two pieces of information can be used to check the motherboard manufacturers website to find out if there is an update available for your current BIOS.

11. How To Change Operating System Boot Priority & Why

Why Change Boot Priority?

We can boot up operating systems from different media.

This can be a hard drive, a USB device or a CD for example.


When our PC first starts up, the BIOS will run. Part of it’s job is to load an operating system into RAM.

It will attempt to boot from the order that is specified in the CMOS settings.


By changing the boot sequence then, we can get our computer to boot an operating system from where ever we would like to.

How To Change Boot Priority

After following the steps further above on ‘How To Change The BIOS Settings‘ you will then be presented with a screen full of options.

It may or may not look exactly like the image below and this would all depend on the system you have, but most of the options are exactly the same.

Changing the Operating System boot priority is just ONE of the options here in BIOS and that’s what I will cover here.

BIOS options screen

Usually the boot priority feature is in the ‘Advanced BIOS Features’ sub menu.


Once you’re comfortable with knowing the keyboard controls (which will be displayed to you on the screen) then navigate to ‘Advanced BIOS Features’ unless your BIOS options menu is different then you may need to search around and look for the ‘Boot Priority’ feature. 

BIOS boot priority

The menu items that we need to find is the ‘First Boot Device’, ‘Second Boot Device’ and ‘Third Boot Device’.


Using the navigation keys that are displayed on screen (the image above shows these keys at the bottom) You need to change the ‘First Boot Device’ to either a hard drive, external USB bootable device or CD.


The second & third boot device won’t ever be used if the BIOS always finds the first boot device and it can boot it without a problem but feel free to change these too if you wish.


If things don’t work out the way you expected then you can always come back to this setup again. 


The only exception to this rule is if you have made some other BIOS change that results in a computer that seems to have stopped working altogether!


You may need to reset the CMOS and clear out all of your BIOS changes and reset back to factory default where I described this earlier in this post.


Saving Changes

Don’t forget to save any BIOS changes that you make, then reboot the system.
The changes will ONLY take affect when saved and rebooted.

Conclusion

So.. what the heck is BIOS?

Hopefully you now have enough knowledge to be dangerous and it’s now time to get yourself a cheap PC and gain some hands-on experience!

If you would like a more in depth guide about BIOS features then I recommend this book. (Image right)

Here is a link to Amazon where you can find ‘Breaking through The BIOS Barrier‘.

This is an old book from 2004 that referenced the legacy BIOS.

UEFI wasn’t implemented back then but legacy BIOS still remains relevant to this day.

holding BIOS book
installtekz icon

Quote Of The Day

installtekz

"When wireless is perfectly applied, the whole earth will be converted into a huge brain..." - Nikola Tesla, 1926

How useful was this post?

Click on a star to rate it!

Average rating 0 / 5. Vote count: 0

No votes so far! Be the first to rate this post.